Crafting Professional Maps: Exporting Maps with Legends in QGIS
Related Articles: Crafting Professional Maps: Exporting Maps with Legends in QGIS
Introduction
With enthusiasm, let’s navigate through the intriguing topic related to Crafting Professional Maps: Exporting Maps with Legends in QGIS. Let’s weave interesting information and offer fresh perspectives to the readers.
Table of Content
Crafting Professional Maps: Exporting Maps with Legends in QGIS
Geographic Information Systems (GIS) software like QGIS empowers users to create, analyze, and communicate spatial data. One of the most critical aspects of communicating spatial information effectively is through visually appealing and informative maps. A map’s legend plays a crucial role in interpreting the map’s data, providing a visual key to understanding the symbols, colors, and patterns used to represent different geographic features.
This article delves into the process of exporting maps with legends in QGIS, outlining the importance of this functionality and providing a comprehensive guide for creating professional and impactful maps.
Understanding the Importance of Legends
A map legend acts as a bridge between the visual representation of data on a map and its real-world meaning. It translates the visual elements like colors, symbols, and patterns into understandable information, enabling the reader to interpret the map’s content accurately.
Here are some key reasons why exporting maps with legends is essential:
- Clarity and Understanding: Legends ensure that map readers can easily grasp the meaning of different features and their associated data. They provide a clear reference point for understanding the map’s symbols and their corresponding values.
- Effective Communication: A well-designed legend enhances the map’s ability to communicate complex spatial information concisely and effectively. It helps to avoid ambiguity and ensure that the message conveyed by the map is understood by the intended audience.
- Accessibility and Inclusivity: Legends make maps more accessible to a wider audience, including those with visual impairments or limited spatial reasoning skills. They provide a textual description of the map’s content, making it easier to comprehend and interpret the data.
- Professionalism and Credibility: Including a legend in a map demonstrates professionalism and attention to detail. It enhances the map’s credibility and reflects a commitment to clear and effective communication.
Navigating the QGIS Export Process
QGIS offers a range of options for exporting maps with legends, allowing users to customize the layout and appearance of their output. The process involves several key steps:
-
Preparing the Map Layout:
- Select the desired map extent: Define the area of interest that will be included in the exported map.
- Add map layers: Choose the appropriate layers from your QGIS project that you wish to display on the map.
- Customize the map elements: Adjust the map’s title, scale, north arrow, and other visual components to create a visually appealing and informative map.
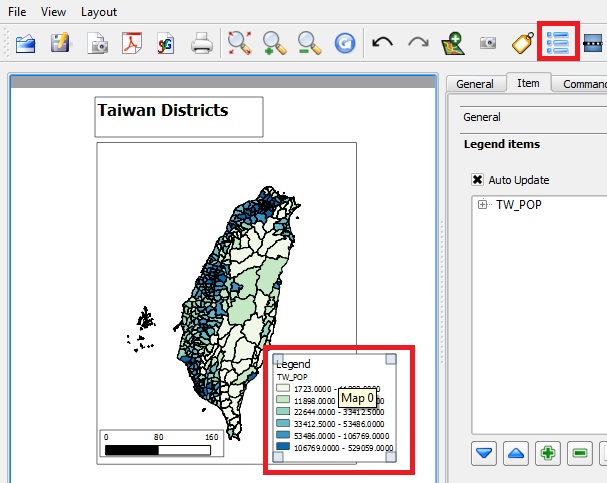
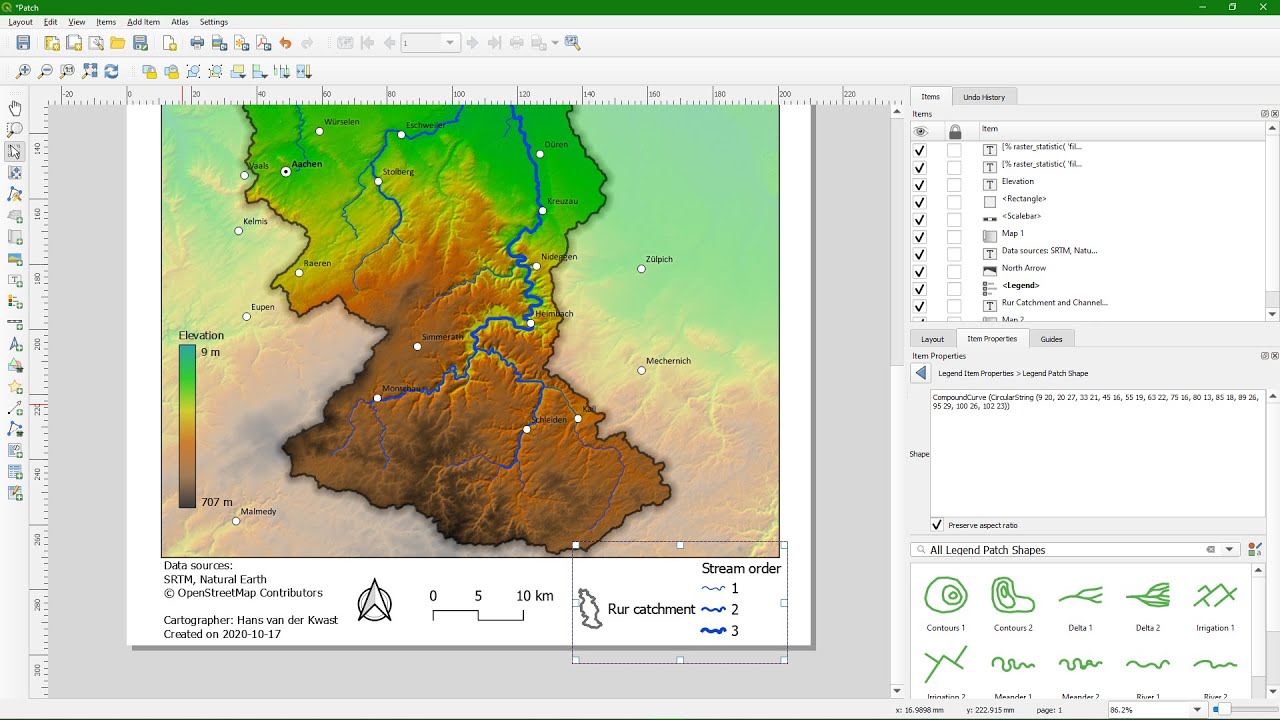
- Create a legend: Use the "Legend" tool in the QGIS layout manager to add a legend to your map.
-
Customize the legend:
- Arrange legend items: Position the legend items in the desired order.
- Adjust legend appearance: Modify the legend’s size, font, and color scheme to match the map’s overall style.
- Modify symbol size and appearance: Adjust the size and appearance of the symbols in the legend to align with the map’s visual representation.
-
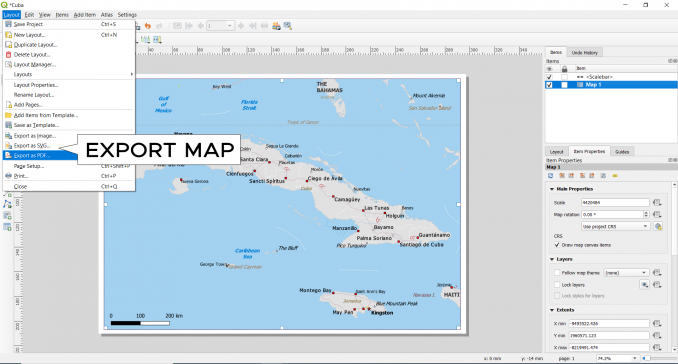
Choosing the Export Format:
- Common image formats: PNG, JPEG, and TIFF offer high-quality image output, suitable for sharing and printing.
- Vector formats: SVG and PDF allow for scalable vector graphics, preserving the map’s quality even when resized.
- Interactive formats: HTML and interactive PDF formats can be used to create dynamic maps with clickable elements and interactive features.
-
Exporting the Map:
- Navigate to the export options: Select the desired export format and specify the output file location.
- Customize export settings: Adjust the resolution, DPI, and other settings to ensure the map’s quality and suitability for its intended use.
- Initiate the export process: Click on the "Export" button to generate the map file.
Optimizing Map Legends for Clarity and Impact
To ensure your map legends effectively communicate information, consider the following tips:
- Keep it concise: Limit the number of entries in the legend to avoid overwhelming the reader.
- Use clear and concise labels: Employ easily understandable language for legend labels.
- Maintain consistency: Ensure that the symbols and colors used in the legend align with the map’s representation.
- Group related items: Organize legend items logically to enhance readability and understanding.
- Consider colorblindness: Choose color combinations that are easily distinguishable for individuals with colorblindness.
- Experiment with different layouts: Explore various legend layouts to find the most effective arrangement for your specific map.
Frequently Asked Questions (FAQs) about Exporting Maps with Legends in QGIS
Q: What are the best practices for creating a legend in QGIS?
A: Creating an effective legend involves:
- Clear and concise labels: Use simple, easily understandable language for legend labels.
- Consistent symbology: Ensure the symbols and colors used in the legend align with those used on the map.
- Logical grouping: Organize legend items into meaningful categories to enhance readability.
- Visual hierarchy: Use font size, color, and spacing to highlight important legend items.
Q: How can I adjust the size and position of the legend?
A: You can modify the legend’s size and position by selecting the legend item in the QGIS layout manager and adjusting its properties. You can also use the "Move" tool to reposition the legend within the map layout.
Q: How do I export a map with a legend in a specific format?
A: QGIS offers various export formats, including image formats (PNG, JPEG, TIFF), vector formats (SVG, PDF), and interactive formats (HTML, interactive PDF). Choose the format that best suits your needs and export the map using the appropriate settings.
Q: Can I export a map with multiple legends?
A: Yes, you can include multiple legends in a single map by adding additional legend items to the layout manager. This allows you to display legends for different layers or categories of data on the same map.
Q: How do I ensure that the legend is legible when printed?
A: To ensure legibility when printed, use a high-resolution output format (e.g., PNG or TIFF) and select a high DPI (dots per inch) setting. Also, consider using a clear and readable font style and size.
Conclusion
Exporting maps with legends in QGIS is a crucial aspect of creating professional and impactful spatial communication tools. By understanding the importance of legends, mastering the export process, and applying best practices for legend design, users can create maps that effectively communicate complex spatial information to a wide audience. As a result, QGIS empowers individuals and organizations to leverage the power of GIS for informed decision-making, effective communication, and impactful storytelling through maps.


Closure
Thus, we hope this article has provided valuable insights into Crafting Professional Maps: Exporting Maps with Legends in QGIS. We appreciate your attention to our article. See you in our next article!